TOP ▲
itcore TOP
> TIPS
> centos6.php
タグ:centos6 ダウンロード vmware apache php mysql 無料ssl リダイレクト CentOS6 インストール 各種設定 | itcore 2017
ダウンロード
事前準備
インストール
初期設定
VMWare tools
Apache,PHP
MySQL
無料SSL(Let’s Encrypt)
リダイレクト
ダウンロード
CentOS6 64bit のネットインストール用ISOファイル
http://ftp.jaist.ac.jp/pub/Linux/CentOS/6.8/isos/x86_64/CentOS-6.8-x86_64-netinstall.iso
事前準備
インストールを始める前に以下の情報を準備する。
・インストール先のサーバ情報(VMwareアカウントなど)
・ホスト名
・リソース量(CPUコア数、メモリサイズ、DISK容量 OS,DATA)
・IPアドレス(プライベート、グローバル)
・rootのパスワード
インストール
CDブートする。
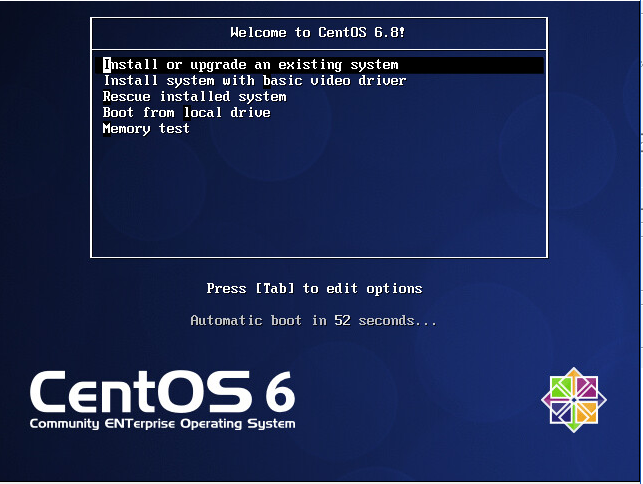
Enter

メディアチェックはSKIP
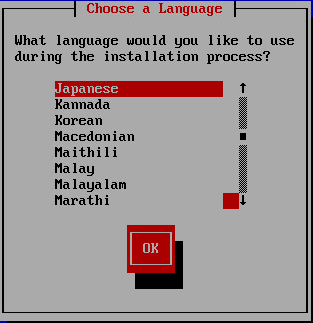
日本語
OK
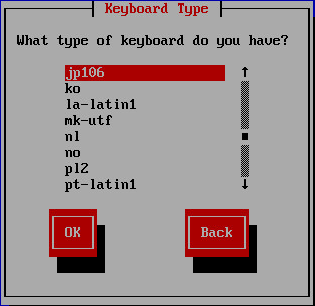
日本語106キーボード
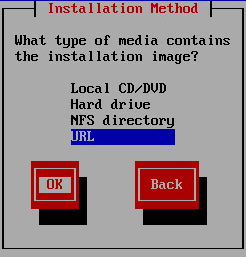
URL ネットインストール

eth0 インストールするネットワークインターフェース
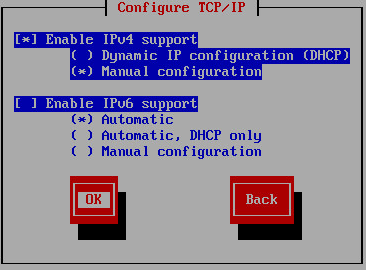
IPv4 固定IP IPv6は無効
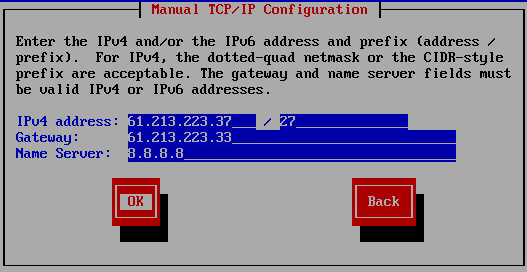
IP情報 DNSはGoogleを利用
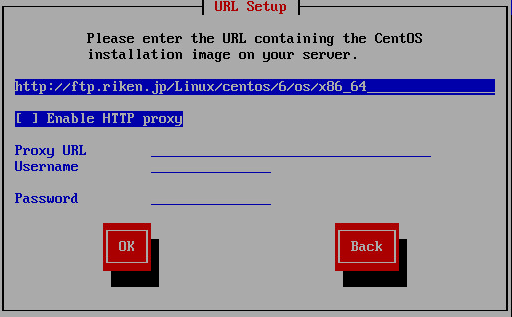
ネットインストール元のurl 大文字小文字も正確に
http://ftp.riken.jp/Linux/centos/6/os/x86_64

urlが正しければ先へ進む
次
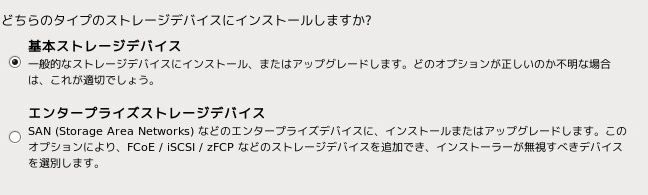
基本ストレージ
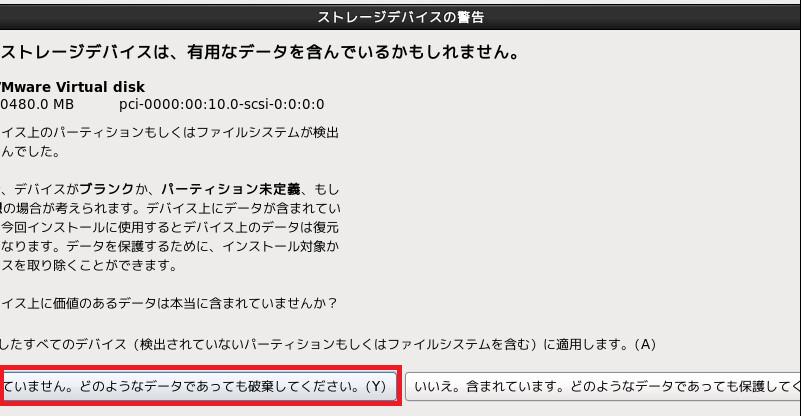
既存のデータは破棄
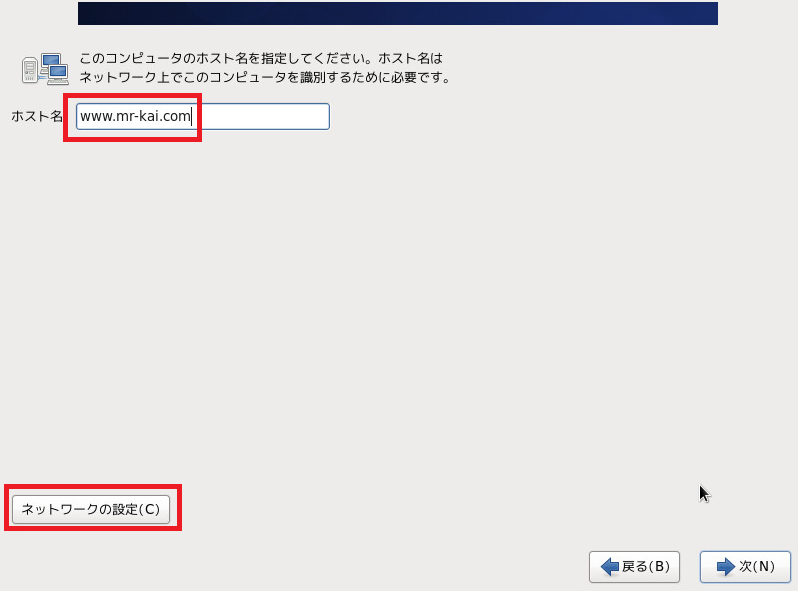
ホスト名を入れて、左下のネットワークの設定を開く(NICが複数の場合)
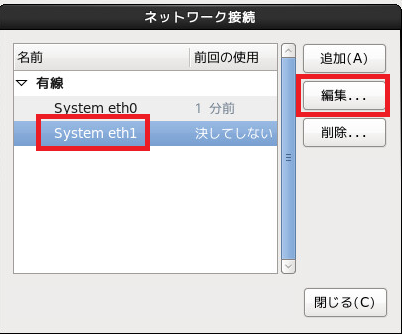
eth1 編集
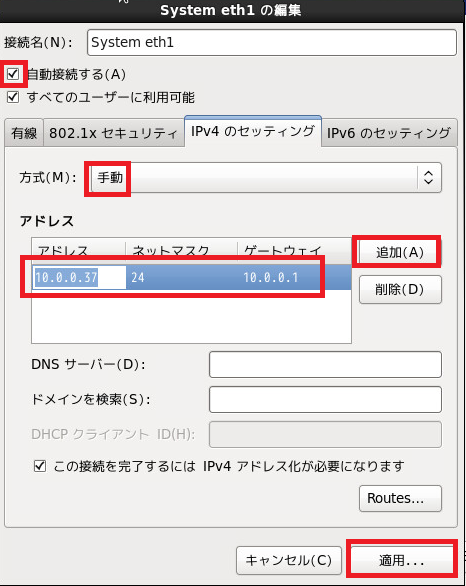
自動接続 追加 プライベートIP 適用
閉じる 次
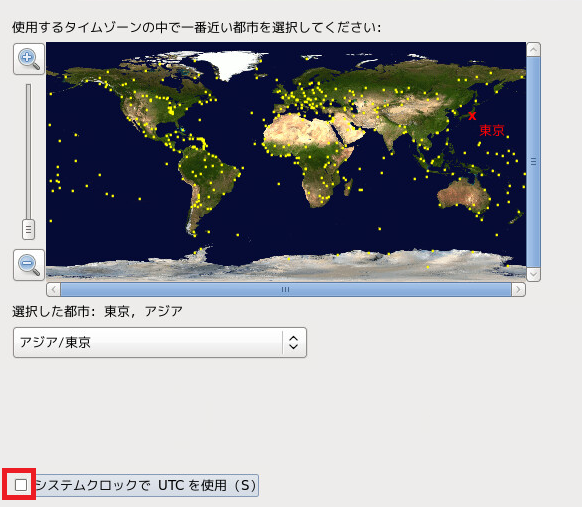
UTCをオフ
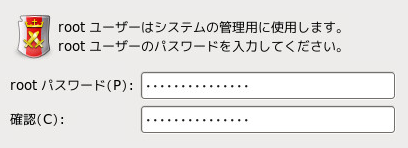
rootのパスワードを入力
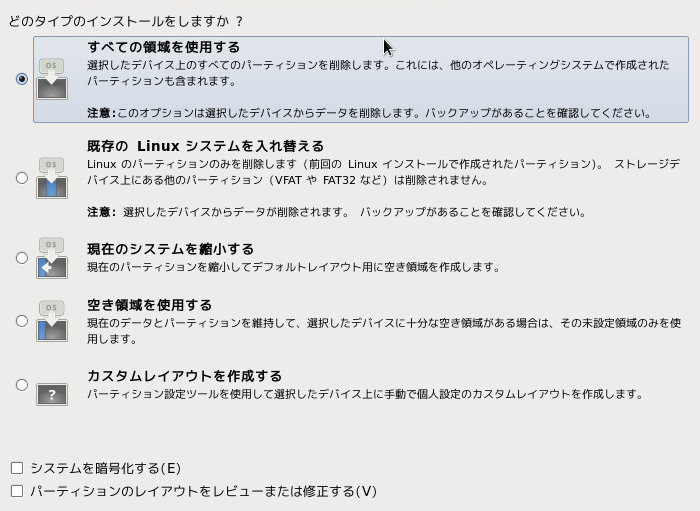
すべての領域を使用
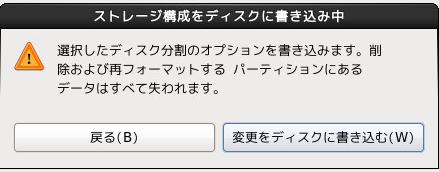
書き込む
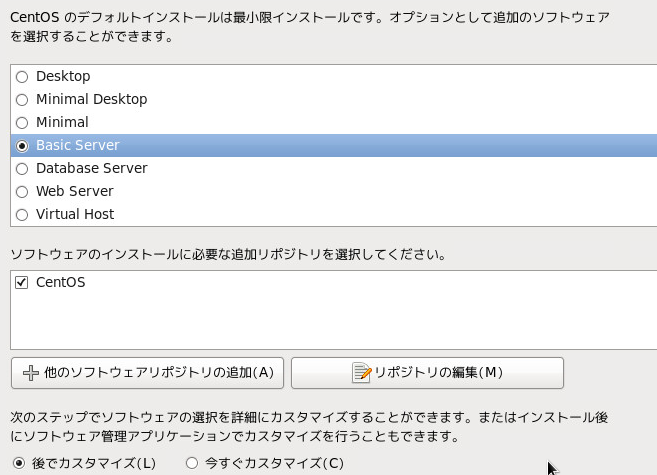
Basic Server
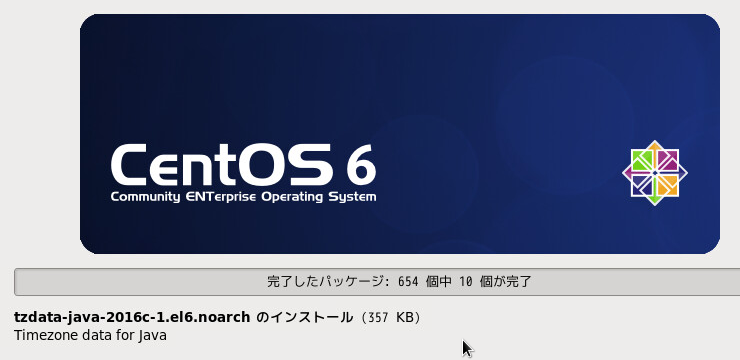
しばらくインストールが続く
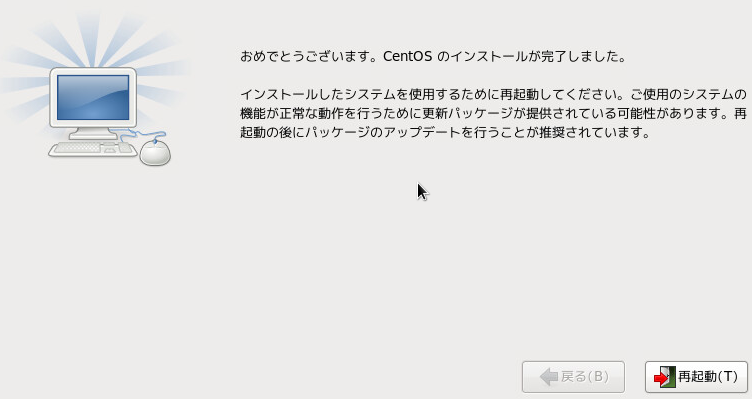
再起動
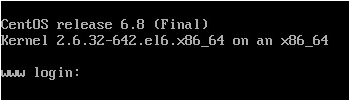
ログインプロンプトが出る。
外部から疎通確認
初期設定
素のままでグローバルにさらしておくとハッキングされるので、
インストールしたらすぐに初期設定する。
少なくともIP制限をかける。
ssh 10.0.0.37 root
# vi install.sh
以下をコピペして、install.shへ保存する。
ここから↓
#!/bin/sh -x
#-------------------------
# CentOS 初期設定
#-------------------------
#-------------------------
# IP制限 プライベートIPのみ許可
#-------------------------
F=/etc/hosts.allow
FB=${F}_`date "+%Y%m%d"`
if ! test -f $FB; then
  cp -np $F $FB
  echo ALL: 10. >> $F
  echo ALL: 192.168. >> $F
  echo ALL: 127.0. >> $F
fi
F=/etc/hosts.deny
FB=${F}_`date "+%Y%m%d"`
if ! test -f $FB; then
  cp -np $F $FB
  echo ALL: ALL >> $F
fi
#-------------------------
# ソフトウェア  アップデート
#-------------------------
FB=/tmp/update.`date "+%Y%m%d"`
if ! test -f $FB; then
  touch $FB
  yum -y update
fi
#-------------------------
# cron 時刻合わせ
#-------------------------
F=/var/spool/cron/root
FB=/root/crontab.`date "+%Y%m%d"`
if ! test -f $FB; then
  test -f $F && cp -np $F $FB
  touch $FB
  echo "1 * * * * /usr/sbin/ntpdate -b ntp.nict.jp ntp.jst.mfeed.ad.jp > /tmp/ntpdate.log 2>&1" >> $F
  /usr/sbin/ntpdate -b ntp.nict.jp ntp.jst.mfeed.ad.jp
  hwclock -w
fi
#-------------------------
# SELINUX 無効化
#-------------------------
F=/etc/selinux/config
FB=${F}_`date "+%Y%m%d"`
if ! test -f $FB; then
  cp -np $F $FB
  perl -pi -e 's/^SELINUX=enforcing/SELINUX=disabled/g' $F
fi
#-------------------------
# サーバ再起動
#-------------------------
shutdown -r now
↑ここまで
設定シェルの実行(最後にサーバを再起動します)
# sh -x install.sh |& tee install.log
グローバル経由でsshできないことを確認する。
プライベート経由でsshする。
日付と時間を確認
# date
2017年 1月 24日 火曜日 17:48:19 JST
CentOSバージョンの確認
# cat /etc/redhat-release
CentOS release 6.8 (Final)
DISK使用量の確認
# df -h
Filesystem            Size  Used Avail Use% Mounted on
/dev/mapper/vg_www-lv_root
                       18G  2.1G   15G  13% /
tmpfs                 499M     0  499M   0% /dev/shm
/dev/sda1             477M   65M  387M  15% /boot
SELINUX確認
# getenforce
Disabled
root宛のメールを転送する。
# cp -ip /etc/aliases /etc/aliases_`date "+%Y%m%d"`
# vi /etc/aliases
root: admin@itcore.jp
# newaliases
テストメール
# mail root
Subject: test
body
.
EOT
# tail /var/log/maillog
to=<admin@itcore.jp>, orig_to=<root>
status=sent
sshのタイムアウトをなくす。
cd /etc/ssh
cp -ip sshd_config sshd_config_`date "+%Y%m%d"`
vi sshd_config
TCPKeepAlive yes
ClientAliveInterval 15
ClientAliveCountMax 3
# service sshd restart
ブラックリストをiptablesに登録する。
/etc/sysconfig/iptables へコピペ
# /etc/init.d/iptables restart
VMWare tools

サーバを稼働させた状態で、コンソールから、仮想マシン>ゲスト>VMware Toolsのインストール/アップグレード
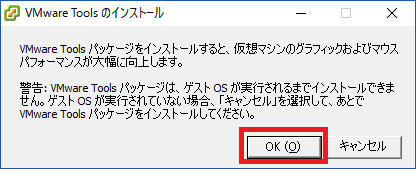
OK
sshでログインする。
# ssh 10.0.0.37 root
設定用のシェル作成
# vi vmtools.sh
以下をコピペ
mkdir -p /mnt/cdrom
mount -r /dev/cdrom /mnt/cdrom
ls /mnt/cdrom
cp /mnt/cdrom/VMwareTools-*.tar.gz /tmp
umount /mnt/cdrom/
cd /tmp
tar zxvf VMwareTools-*.tar.gz
cd vmware-tools-distrib/
./vmware-install.pl
シェルを実行する。
# sh -x vmtools.sh
すべて改行でOK
# /usr/bin/vmware-toolbox-cmd -v
9.4.5.30548 (build-1598834)

Vmwareのサマリ画面で実行中となり、IPアドレスも表示される。
Apache,PHP
# yum -y install httpd
# yum -y install php php-mbstring php-gd
# service httpd start
# chkconfig httpd on
# chkconfig --list httpd
# cd /etc/sysconfig
# cp -ip iptables iptables_`date "+%Y%m%d"`
# vi iptables
-A INPUT -i lo -j ACCEPT
の下へ追加
-A INPUT -p tcp -m tcp --dport 80 -j ACCEPT
-A INPUT -p tcp -m tcp --dport 443 -j ACCEPT
# /etc/init.d/iptables restart
# iptables -L
Chain INPUT (policy ACCEPT)
target prot opt source destination
ACCEPT all -- anywhere anywhere state RELATED,ESTABLISHED
ACCEPT icmp -- anywhere anywhere
ACCEPT all -- anywhere anywhere
ACCEPT tcp -- anywhere anywhere tcp dpt:http
ACCEPT tcp -- anywhere anywhere tcp dpt:https
ACCEPT tcp -- anywhere anywhere state NEW tcp dpt:ssh
REJECT all -- anywhere anywhere reject-with icmp-host-prohibited Chain FORWARD (policy ACCEPT) target prot opt source destination
REJECT all -- anywhere anywhere reject-with icmp-host-prohibited Chain OUTPUT (policy ACCEPT) target prot opt source destination
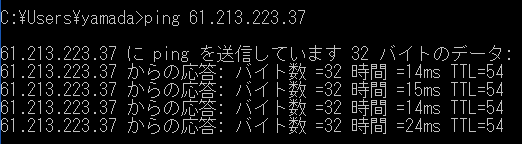
http://61.213.223.37
デフォルト画面が出る。
# touch /var/www/html/index.html
http://61.213.223.37
空白画面になる。
バーチャルホストの設定
# cd /etc/httpd/conf
# cp -ip httpd.conf httpd.conf_`date "+%Y%m%d"`
# vi httpd.conf
:990
NameVirtualHost *:80
:wq
# cd /etc/httpd/conf.d
# vi www.mr-kai.com.conf
<VirtualHost *:80>
    ServerAdmin admin@mr-kai.com
    DocumentRoot /home/www/www.mr-kai.com/htdocs
    ServerName www.mr-kai.com
    ErrorLog /home/www/www.mr-kai.com/log/error.log
    CustomLog /home/www/www.mr-kai.com/log/access.log common
</VirtualHost>
<Directory /home/www/www.mr-kai.com/htdocs>
    Options Includes ExecCGI FollowSymLinks
    AllowOverride All
</Directory>
# mkdir -p /home/www/www.mr-kai.com/htdocs
# mkdir -p /home/www/www.mr-kai.com/log
# touch /home/www/www.mr-kai.com/log/error.log
# touch /home/www/www.mr-kai.com/log/access.log
# echo www.mr-kai.com > /home/www/www.mr-kai.com/htdocs/index.php
# chown -R apache.apache /home/www/www.mr-kai.com
FTPで更新する場合はFPアカウントのオーナーとする。
# find /home/www/www.mr-kai.com -type d -print | xargs chmod 755
# find /home/www/www.mr-kai.com -type f -print | xargs chmod 644
# apachectl configtest
Syntax OK
# service httpd restart
PCのhostsに一時設定
メモ帳を管理者モードで起動して、以下のファイルを開き、行を追加する。
c:\windows\system32\drivers\etc\hosts
61.213.223.37 www.mr-kai.com
http://www.mr-kai.com
以下の1行が表示される。
www.mr-kai.com
ログローテーション 月毎 2年分
mkdir -p /etc/logrotate.d/rireki
cp -ip /etc/logrotate.d/httpd /etc/logrotate.d/rireki/httpd_`date "+%Y%m%d"`
vi /etc/logrotate.d/httpd
以下を追加
/home/www/*/log/*.log {
    monthly
    missingok
    rotate 24
    delaycompress
    ifempty
    sharedscripts
    postrotate
        /sbin/service httpd graceful
    endscript
}

チェック
# logrotate -d /etc/logrotate.d/httpd
# logrotate -d /etc/logrotate.conf
MySQL
MySQLインストール
# yum -y install mysql-server php-mysql
# service httpd restart
MySQLサーバーの文字コードをUTF-8にする
# cp -ip /etc/my.cnf /etc/my.cnf_`date "+%Y%m%d"`
# vi /etc/my.cnf
symbolic-links=0 の下へ追加
character-set-server = utf8
MySQL起動
# service mysqld start
パスワードの設定
/usr/bin/mysqladmin -u root password 'パスワード'
MySQL自動起動設定
# chkconfig mysqld on
# chkconfig --list mysqld
動作確認
# mysql -uroot -p
パスワード
mysql> show databases;
+--------------------+
| Database |
+--------------------+
| information_schema |
| mysql |
| test |
+--------------------+
3 rows in set (0.00 sec)
mysql> use mysql
Reading table information for completion of table and column names
You can turn off this feature to get a quicker startup with -A
Database changed
mysql> show tables;
+---------------------------+
| Tables_in_mysql |
+---------------------------+
| columns_priv |
| db |
| event |
| func |
| general_log |
| help_category |
| help_keyword |
| help_relation |
| help_topic |
| host |
| ndb_binlog_index |
| plugin |
| proc |
| procs_priv |
| servers |
| slow_log |
| tables_priv |
| time_zone |
| time_zone_leap_second |
| time_zone_name |
| time_zone_transition |
| time_zone_transition_type |
| user |
+---------------------------+
23 rows in set (0.00 sec)
>exit
MySQL初期設定
# mysql_secure_installation
Enter current password for root (enter for none):
# パスワード
Change the root password? [Y/n]
# n
以降 すべて空Enter
Remove anonymous users? [Y/n]
Disallow root login remotely? [Y/n]
Remove test database and access to it? [Y/n]
Reload privilege tables now? [Y/n]
# mysql -uroot -p
mysql> show databases;
+--------------------+
| Database |
+--------------------+
| information_schema |
| mysql |
+--------------------+
testがなくなっている。
mysql> exit
無料SSL(Let’s Encrypt)
DNSに登録 ※DNSに登録されていないと認証されない。
www.mr-kai.com
mr-kai.com
Let’s Encryptをgitからダウンロード
# cd /root
# yum -y install git
# git clone https://github.com/certbot/certbot
依存パッケージ更新
# cd certbot
# ./certbot-auto
Is this ok [y/d/N]: y
証明書発行
# /root/certbot/certbot-auto certonly --webroot -w /home/www/www.mr-kai.com/htdocs -d www.mr-kai.com -d mr-kai.com -m admin@itcore.jp --renew-by-default --agree-tos --debug
以下 メッセージ
Renewing an existing certificate
Performing the following challenges:
http-01 challenge for www.mr-kai.com
http-01 challenge for mr-kai.com
Using the webroot path /home/www/www.mr-kai.com/htdocs for all unmatched domains.
Waiting for verification...
Cleaning up challenges
Generating key (2048 bits): /etc/letsencrypt/keys/0004_key-certbot.pem
Creating CSR: /etc/letsencrypt/csr/0004_csr-certbot.pem
IMPORTANT NOTES:
- Congratulations! Your certificate and chain have been saved at
/etc/letsencrypt/live/www.mr-kai.com/fullchain.pem. Your cert will
expire on 2017-05-18. To obtain a new or tweaked version of this
certificate in the future, simply run certbot-auto again. To
non-interactively renew *all* of your certificates, run
"certbot-auto renew"
- If you like Certbot, please consider supporting our work by:
Donating to ISRG / Let's Encrypt: https://letsencrypt.org/donate
Donating to EFF: https://eff.org/donate-le
apache設定
# cd /etc/httpd/conf.d
# cp -ip ssl.conf ssl.conf_`date "+%Y%m%d"`
# vi ssl.conf
<VirtualHost _default_:443>以降を削除
以下を追加
NameVirtualHost *:443
# cp -ip www.mr-kai.com.conf www.mr-kai.com.conf_`date "+%Y%m%d"`
# vi www.mr-kai.com.conf
<VirtualHost *:443>
SSLEngine on
SSLCertificateFile /etc/letsencrypt/live/www.mr-kai.com/cert.pem
SSLCertificateKeyFile /etc/letsencrypt/live/www.mr-kai.com/privkey.pem
SSLCertificateChainFile /etc/letsencrypt/live/www.mr-kai.com/chain.pem
ServerAdmin admin@mr-kai.com
DocumentRoot /home/www/www.mr-kai.com/htdocs
ServerName www.mr-kai.com
ServerAlias mr-kai.com
ErrorLog /home/www/www.mr-kai.com/log/error.log
CustomLog /home/www/www.mr-kai.com/log/access.log common
</VirtualHost>
# service httpd restart
外部のFWを使っている場合は、そちらにも証明書を設定する。
# cat /etc/letsencrypt/live/www.mr-kai.com/cert.pem
# cat /etc/letsencrypt/live/www.mr-kai.com/privkey.pem
# cat /etc/letsencrypt/live/www.mr-kai.com/chain.pem
証明書の期限は3ヶ月なので、cronで毎月自動更新する。
# crontab -e
0 1 1 * * (/root/certbot/certbot-auto renew --force-renew && /etc/init.d/httpd reload) > /root/certbot-update.log 2>&1
外部のFWを使っている場合は、更新された証明書を手動で設定する。(2ヶ月に一度)
リダイレクト
https://wwwmr-kai.comへのリダイレクト (mr-kai.com→www.mr-kai.com http→https)
# cd /home/www/www.mr-kai.com/htdocs
# cp -ip .htaccess .htaccess_`date "+%Y%m%d"`
# vi .htaccess
RewriteEngine on
RewriteCond %{HTTP_HOST} ^mr-kai\.com
RewriteRule ^(.*)$ http://www.mr-kai.com/$1 [R=301,L]
RewriteCond %{HTTPS} off
RewriteRule ^(.*)$ https://%{HTTP_HOST}%{REQUEST_URI} [R,L]