TOP ▲
itcore TOP
> TIPS
> mail.php
タグ:メールサーバ centos7 dns sasl postfix dovecot firewall ssl/tls証明書 smtps pops imaps thunderbird メールサーバ in CentOS7 インストール| itcore 2017年
CentOS7
DNS
SASL
Postfix
Dovecot
Firewall
ユーザ作成
追加パッケージ
SSL/TLS証明書
SMTPS
POPS/IMAPS
Thunderbird
CentOS7
CentOS7をインストールします。
DNS
サーバ名をDNSに登録します。
逆引きも登録します。(逆引きが設定されていないとセキュリティではじかれることがあるため)
C:\Users\yamada>nslookup
> mail.itcore.jp
名前: mail.itcore.jp
Address: 61.213.223.41
> 61.213.223.41
名前: mail.itcore.jp
Address: 61.213.223.41
Aliases: 41.223.213.61.in-addr.arpa
SASL
SMTP認証用のSASL(Simple Authentication and Security Layer)
Cyrus SASL(サイラス サスル)ライブラリをインストールします。
# yum install -y cyrus-sasl
# systemctl start saslauthd
# systemctl enable saslauthd
# cp -ip /etc/sasl2/smtpd.conf /etc/sasl2/smtpd.conf_`date "+%Y%m%d"`
# vi /etc/sasl2/smtpd.conf
saslauthdをauxpropに変更します。
pwcheck_method: auxprop
mech_list: plain login
Postfix
Postfixをインストールします。
xxx@mail.itcore.jp を扱います。
xxx@itcore.jpは別サーバの場合です。
# yum install -y postfix
# cp -ip /etc/postfix/main.cf /etc/postfix/main.cf_`date "+%Y%m%d"`
# vi /etc/postfix/main.cf
:77
myhostname = mail.itcore.jp
:84
#mydomain = itcore.jp
:100
myorigin = $myhostname
#myorigin = $mydomain
:114
inet_interfaces = all
#inet_interfaces = localhost
:121
#inet_protocols = all
inet_protocols = ipv4
:166
mydestination = $myhostname, localhost.$mydomain, localhost
#mydestination = $myhostname, localhost.$mydomain, localhost, $mydomain
:213
local_recipient_maps =
:299
relay_domains = $mydestination
:421
home_mailbox = Maildir/
:$
# SMTP-Auth
smtpd_sasl_auth_enable = yes
smtpd_recipient_restrictions =
permit_mynetworks
permit_sasl_authenticated
reject_unauth_destination
# mail size 10MB
message_size_limit = 10485760
:wq
SUBMISSIONポート有効化
# cp -ip /etc/postfix/master.cf /etc/postfix/master.cf_`date "+%Y%m%d"`
# vi /etc/postfix/master.cf
:16
submission inet n - n - - smtpd
:19
-o smtpd_sasl_auth_enable=yes
:wq
# systemctl restart postfix
# systemctl enable postfix
メールボックス
# mkdir -p /etc/skel/Maildir/{new,cur,tmp}
# chmod -R 700 /etc/skel/Maildir/
Dovecot
Dovecotをインストールします。
# yum install -y dovecot
# cp -ip /etc/dovecot/conf.d/10-mail.conf /etc/dovecot/conf.d/10-mail.conf_`date "+%Y%m%d"`
# vi /etc/dovecot/conf.d/10-mail.conf
:31
mail_location = maildir:~/Maildir
:wq
# cp -ip /etc/dovecot/conf.d/10-auth.conf /etc/dovecot/conf.d/10-auth.conf_`date "+%Y%m%d"`
# vi /etc/dovecot/conf.d/10-auth.conf
:10
disable_plaintext_auth = no
:wq
# cp -ip /etc/dovecot/conf.d/10-ssl.conf /etc/dovecot/conf.d/10-ssl.conf_`date "+%Y%m%d"`
# vi /etc/dovecot/conf.d/10-ssl.conf
:8
#ssl = required
ssl = no
:wq
# systemctl start dovecot
# systemctl enable dovecot
Firewall
# firewall-cmd --add-service=smtp --permanent
# firewall-cmd --add-service=smtps --permanent
# firewall-cmd --add-service=pop3 --permanent
# firewall-cmd --add-service=pop3s --permanent
# firewall-cmd --add-service=imaps --permanent
# firewall-cmd --add-port=143/tcp --permanent
# firewall-cmd --add-port=587/tcp --permanent
# firewall-cmd --reload
# firewall-cmd --list-all
ユーザ作成
# useradd -s /sbin/nologin yamada.toshihiro
# passwd yamada.toshihiro
パスワード
# saslpasswd2 -u mail.itcore.jp -c yamada.toshihiro
パスワード
# sasldblistusers2
yamada.toshihiro@mail.itcore.jp: userPassword
# chgrp postfix /etc/sasldb2
# chmod 640 /etc/sasldb2
ここまででSSLを使わないメールサーバとして利用できます。
追加パッケージ
# yum -y groupinstall base
# yum -y groupinstall development
# yum -y groupinstall network-tools
以下のメッセージは問題ありません。
「インストールまたは更新に利用できるいくつかの要求されたグループにパッケージがあ りません」
SSL/TLS証明書
Let's Encryptで無料の証明書を作成します。
# cd /usr/local/
# git clone https://github.com/certbot/certbot
# cd certbot/
# ./certbot-auto -n
# firewall-cmd --add-port=80/tcp --permanent
# firewall-cmd --add-port=443/tcp --permanent
# firewall-cmd --reload
# ./certbot-auto certonly --standalone \
# -d mail.itcore.jp \
# -m yamada@itcore.jp \
# --agree-tos -n
IMPORTANT NOTES:
- Congratulations! Your certificate and chain have been saved at:
/etc/letsencrypt/live/mail.itcore.jp/fullchain.pem
Your key file has been saved at:
/etc/letsencrypt/live/mail.itcore.jp/privkey.pem
Your cert will expire on 2018-02-01. To obtain a new or tweaked
version of this certificate in the future, simply run certbot-auto
again. To non-interactively renew *all* of your certificates, run
"certbot-auto renew"
- Your account credentials have been saved in your Certbot
configuration directory at /etc/letsencrypt. You should make a
secure backup of this folder now. This configuration directory will
also contain certificates and private keys obtained by Certbot so
making regular backups of this folder is ideal.
- If you like Certbot, please consider supporting our work by:
Donating to ISRG / Let's Encrypt: https://letsencrypt.org/donate
Donating to EFF: https://eff.org/donate-le
自動更新
# crontab -e
0 1 1 * * (/usr/local/certbot/certbot-auto renew --force-renewal && /bin/systemctl reload postfix && /bin/systemctl reload dovecot) > /tmp/certbot.log 2>&1
有効期限の確認
# openssl x509 -in /etc/letsencrypt/live/mail.itcore.jp/fullchain.pem -noout -dates
notBefore=Nov 3 19:51:00 2017 GMT
notAfter=Feb 1 19:51:00 2018 GMT
SMTPS
# cp -ip /etc/postfix/main.cf /etc/postfix/main.cf_`date "+%Y%m%d"`smtps
# vi /etc/postfix/main.cf
:$
# smtps
smtpd_sasl_type = dovecot
smtpd_sasl_path = private/auth
broken_sasl_auth_clients = yes
smtpd_use_tls = yes
smtp_tls_security_level = may
smtpd_tls_cert_file = /etc/letsencrypt/live/mail.itcore.jp/fullchain.pem
smtpd_tls_key_file = /etc/letsencrypt/live/mail.itcore.jp/privkey.pem
smtpd_tls_loglevel = 1
smtpd_tls_received_header = yes
smtpd_tls_session_cache_database = btree:/var/lib/postfix/smtpd_scache
smtpd_tls_session_cache_timeout = 3600s
:wq
# cp -ip /etc/postfix/master.cf /etc/postfix/master.cf_`date "+%Y%m%d"`smtps
# vi /etc/postfix/master.cf
:26
smtps inet n - n - - smtpd
:34
-o smtpd_recipient_restrictions=permit_sasl_authenticated,reject
:wq
# postmap /etc/postfix/access
# postfix check
# systemctl restart postfix
POPS/IMAPS
# cp -ip /etc/dovecot/dovecot.conf /etc/dovecot/dovecot.conf_`date "+%Y%m%d"`pops
# vi /etc/dovecot/dovecot.conf
:24
protocols = imap pop3 lmtp
:wq
# cp -ip /etc/dovecot/conf.d/10-master.conf //etc/dovecot/conf.d/10-master.conf_`date "+%Y%m%d"`pops
# vi /etc/dovecot/conf.d/10-master.conf
:19
port = 143
:22
port = 993
ssl = yes
:40
port = 110
:43
port = 995
ssl = yes
:96
unix_listener /var/spool/postfix/private/auth {
# mode = 0666
mode = 0660
user = postfix
group = postfix
}
:wq
# cp -ip /etc/dovecot/conf.d/10-auth.conf //etc/dovecot/conf.d/10-auth.conf_`date "+%Y%m%d"`pops
# vi /etc/dovecot/conf.d/10-auth.conf
:101
auth_mechanisms = plain login
:wq
# cp -ip /etc/dovecot/conf.d/10-ssl.conf //etc/dovecot/conf.d/10-ssl.conf_`date "+%Y%m%d"`pops
# vi /etc/dovecot/conf.d/10-ssl.conf
:8
#ssl = required
#ssl = no
ssl = yes
:16
#ssl_cert = </etc/pki/dovecot/certs/dovecot.pem
#ssl_key = </etc/pki/dovecot/private/dovecot.pem
ssl_cert = </etc/letsencrypt/live/mail.itcore.jp/fullchain.pem
ssl_key = </etc/letsencrypt/live/mail.itcore.jp/privkey.pem
:wq
# cp -ip /etc/dovecot/conf.d/10-logging.conf //etc/dovecot/conf.d/10-logging.conf_`date "+%Y%m%d"`pops
# vi /etc/dovecot/conf.d/10-logging.conf
:7
#log_path = syslog
log_path = /var/log/dovecot/dovecot.log
:wq
# mkdir /var/log/dovecot
# systemctl restart dovecot
認証ソケットファイルが作成されているのを確認します
以下はNG dovecotをリスタートしていない等
# ls -F /var/spool/postfix/private/auth
ls: /var/spool/postfix/private/auth にアクセスできません: そのようなファイルや ディレクトリはありません
以下はOK
# ls -F /var/spool/postfix/private/auth
/var/spool/postfix/private/auth=
Thunderbird
フリーのメールクライアント Thnuderbirdの設定例です。
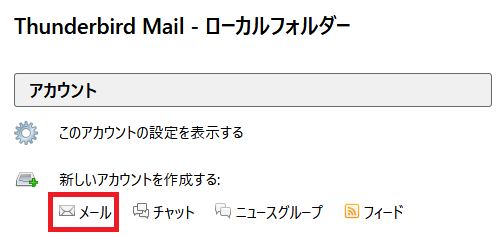
メールのアカウントを新規に作成します。
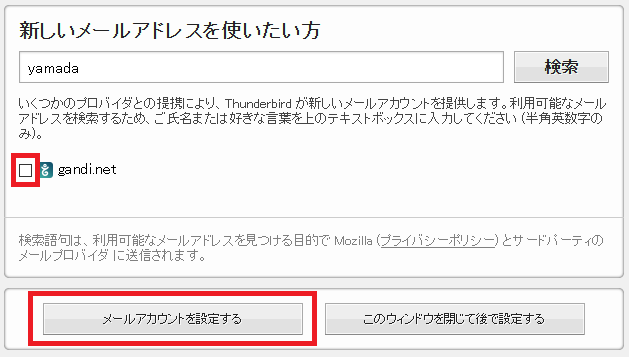
プロバイダのチェックを外して、「メールアカウントを設定する」をクリックします。

作成したユーザを指定します。
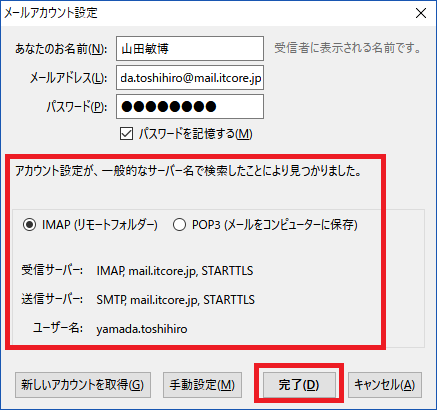
SMARTTLSで接続に成功しました。